Parmigiana di melanzane (Eggplant Parmesan)

20201111_192515 (2)

I made this dish earlier this week and posted a few photos to social media. The recipe requests were overwhelming, so I decided it was a good time to start updating my blog again. I know it has been a long time, please forgive my laziness!

This recipe was modeled after the wonderful Parmigiana di melanzane my wife enjoyed at Pia’s Trattoria in Gulfport, Florida. I was rather pleased with the result and my wife, Kat, definitely approved! I’ve made it twice now and it is a little bit of work but so worth the effort.

Speaking of work, using the jarred sauce and seasoned Panko crumbs saves a little time here. If you really want to make your favorite fresh marinara and breadcrumbs go for it. Post a comment here and let me know how it comes out…I love hearing from you!

Parmigiana di melanzane (Eggplant Parmesan)

1 large – Globe Eggplant, washed and sliced crossways, 1/8” to 3/16” thick

2 cups – Seasoned Breadcrumbs (I used seasoned Panko)

3 – Eggs, mixed well with 3 Tbsp water

2 cups – All Purpose Flour

1 Jar – Prepared Marinara Sauce (I used Rao’s)

2 rounds – Fresh Mozzarella

1 Wedge – Parmesano Reggiano

½ Cup – Fresh Basil, torn into roughly ½” pieces

Avocado Oil (or your favorite neutral oil)

Kosher Salt

Place a baking rack on a half sheet pan (18” X 13”) and place eggplant slices on the rack overlapping if necessary, to fit them all. Sprinkle evenly with kosher salt and rest for at least 30 minutes.

After 30 minutes use paper towels to blot away any excess moisture that has formed on the eggplant.

Add a little less than 1/8” inch depth oil to a large skillet or Dutch oven over medium heat.

Working in batches, dredge eggplant slices in flour, shaking away excess flour, dip slices in egg wash, then, after allowing excess egg to drain away, finally dredge slices in breadcrumbs. (You are looking for a light but even coating here.)

When the oil is shimmering hot, again working in batches, add eggplant to the pan spaced evenly in a single uncrowded layer. Cook, turning occasionally, until golden brown on both sides. (Here you are looking for even, gentle browning. Adjust the heat up or down during cooking to keep oil bubbling but not burning the crust…Like this. After each batch add a little more oil to maintain depth.)

Remove browned eggplant to a baking rack or paper towels. It is ok to overlap the slices a little to make room.

Meanwhile, preheat your oven to 425 degrees.

When all of the eggplant is browned begin construction by adding a light layer of marinara sauce to a greased (I used butter) 9” X 13” baking dish. Next add a layer of eggplant slices evenly space. (We will be looking to make stacks so no need to overlap.)

Spoon marinara sauce lightly but evenly over the slices then top each slice with 2 or 3 torn pieces of mozzarella, scatter with some of the basil, then generously grate parmesan over all.

Repeat this process saving the smallest eggplant slices for the top of your eggplant stacks.

Top with any remaining basil, more pieces of mozzarella (I had a little left over for the chef), and another generous layer of grated parmesan. Cover the dish with aluminum foil or parchment paper and bake 15 minutes. After 15 minutes remove the covering and bake 15 minutes more.

Remove the dish from the oven and cool for a few minutes before serving. Garnish with chopped parsley or a little more fresh basil and enjoy!

By Request: Pan Seared Fish with a simple Lemon Buerre Blanc

17620112_10213526208097874_2540471774217116928_o

I was so pleased to find fresh Pacific Halibut at my local Costco this week! The fish was glistening and moist looking and sprung back immediately when I gave it a good poke with my finger, a good sign of freshness. I couldn’t wait to get home and give it a taste!

With a quality fish this fresh I usually keep the preparation simple. I like to enhance, not overpower, the flavor of the fish itself. I cut these fillets into portions, patted them dry on each side, then seasoned them with nothing but a little salt & fresh ground black pepper with a dusting of Old Bay Seasoning.

I warmed 2 tablespoons of grapeseed oil in a saute pan over medium high heat until the oil was shimmering then gently placed the fish into the pan…the rest is tasty, melt in your mouth history and you can read the details in the recipe below. Mmm Mmm Good!

Note: If you want to jazz this sauce up there are many variations; add a little white wine, some chopped shallots, or a splash of heavy cream and reduce these along with the lemon juice for a little extra flavor.

Pan Seared Fish with Lemon Buerre Blanc

2 to 4 – (6 Ounce) Firm white fish fillets at least 1” thick. (Such as Mahi-Mahi, Grouper, or Halibut)

1 Ounce – Freshly squeezed lemon juice (About 2 Tablespoons)

4 Tablespoons – Unsalted Butter, cut in roughly ½” cubes (1/2 Stick)

2 Tablespoons – Grape Seed oil (Olive oil or Canola is fine!)

Salt & fresh ground black pepper, to taste

Old Bay Seasoning, to taste.

Pre-heat the oven to 350 and using a paper towel pat the fish to dry the surface very well. Season both sides with salt & pepper and a little Old Bay then heat 2 tablespoons of oil in a non-stick pan over medium-high heat until shimmering hot.

Swirl the pan to evenly coat the cooking surface then carefully place the fish, skin side up / flesh side down, in the pan. Cook 3 minutes (without moving) then gently turn over and cook 3 minutes more. Carefully remove the fish to an oven-proof dish and place it in the oven to finish cooking through.

While the pan is still hot pour out any excess oil and with the pan still off the heat add the lemon juice. Swirl the sizzling juice for about 30 seconds then return the pan to the heat to reduce the moisture. Simmer, swirling the pan from time to time until the liquid begins to thicken, about 3 minutes. Remove the pan from heat and add the butter cubes a few at a time swirling the pan as they melt. Still off the heat, continue swirling in the butter cubes until all are incorporated into a rich sauce.

The fish should be done about the same time as the sauce. Check to make sure the fillets have cooked through, leaving it in the oven a little longer if necessary. (Never overcook fish!) Carefully remove the fish from the oven and place each fillet on a plate. Spoon a little the sauce over each fillet and serve.

By request: Beer Braised Corned Beef Brisket & Cabbage

I was asked to settle a debate this week and while I’m uncertain whether it was my food knowledge, my part Irish heritage, or simply my well known penchant for eating food that led them to me, I was more than happy to throw in my two cents. The question was “Is corned beef really Irish?” In fact, I told them, it is Irish but the tradition of eating corned beef and cabbage on St Patty’s day is uniquely American.

Historically corned beef (named so because the salt used in the process resembled corn kernels) or salt cured beef was an export of Ireland but rarely ever was it eaten by the locals. In those days Beef was generally too expensive for the common people and a dish of boiled “bacon” and cabbage was much more customary. What they called “bacon” was pretty much any part of the pig, other than the ham, that contained a joint…typically what we know as the shoulder or the loin.

Later, when Irish immigrants came to America, beef was actually far more available than pork so they “corned” the beef and cooked it with cabbage in an effort to replicate their comfort food from back home. Loosely, this is assumed to be the origin of the wholly American tradition of corned beef & cabbage on St. Patrick’s Day. Interestingly, to this day, corned beef and cabbage in Ireland is generally reserved for the tourists!

For a great read on the subject check out Europeancuisines.com .

Through the years I tried every method known to man for preparing corned beef including boiling, stove-top braising, baking and most recently sous vide. For depth of flavor and melt-in-your-mouth tenderness, this slow oven braise remains my go-to recipe for corned beef. Make enough for leftovers because the sandwiches are awesome and the chopped meat makes for an incredible corned beef hash!

Beer Braised Corned Beef Brisket & Cabbage

1 – 3 to 4 pound First cut corned beef (**See note)
1 or 2 cans – Guinness draft
10 to 12 – Mixed peppercorns (pink, green, black, etc…)
6 to 8 – Cloves of garlic, smashed
4 to 6 – Allspice berries
2 to 3 – Bay leaves
1 to 2 – Star anise pods

Note: Reserve vegetables for later. These can be added and cooked with the roast for the final hour of cooking or boiled in the pot juices while the roast  rests.

1 Head – Green or Napa cabbage, quartered
3 to 4 Large, or 4 to 6 Med – Red bliss potatoes
2 Med – White onions, halved

Pre-heat the oven to 300 degrees. Remove the corned beef from its packaging and rinse in cold water while rubbing with your hands to remove any scum left over from the brine. Place the roast, fatty side up, in a heavy-bottomed Dutch oven (or a pot with a tight fitting lid) and pour in enough beer to come about 1/3 of the way up the sides, sliding the roast around a little to get some liquid underneath. Add the remaining ingredients, distributing them evenly around the beef (if your roast is larger add more / if it is smaller add less of the spice).

Note: If your Corned Beef comes with a spice packet add that too…flavor is flavor!

On your stovetop over medium heat, bring the beer to a gentle boil then cover the pot tightly with aluminum foil placing the Dutch oven lid on top of that for a nice firm seal. Place the whole thing in the oven and roast, without peeking for 3 – ½ to 4 hours again depending on the size. The beef should be very tender after 4 hours…if not put it back in the oven and check it every 30 minutes until it is very tender.

Remove the corned beef and wrap it in the foil to rest. Meanwhile, place quartered cabbage (cut side down), red bliss potatoes, and white onion halves in the cooking liquid, return to a boil, cover and cook for 15 minutes while the Corned Beef is resting. After 15 to 20 minutes of rest, slice the Corned Beef, across the grain and serve with vegetables and your favorite Dijon Mustard.

**Note: Corned beef is generally sold as Whole Brisket, Half Brisket – First Cut (or Flat), or Half Brisket – Point Cut. The first cut (or Flat) is my favorite. This cut comes from the wide flat half of the whole brisket with the Point Cut coming from the thicker, fattier end of the Brisket. The First Cut is generally leaner and more suitable for the dinner plate. The Point Cut is “generally” fattier and more suitable for sandwiches. Hence, most of the time when you see a sale on corned beef it will be the Point Cut. Do yourself a favor and stick with the First Cut.

Enjoy,

Randy

Shepherds Pie, American Style

5516020923_2c0516fc5d_o

I call this recipe “Shepherds Pie, American Style” because I have read or heard much debate through the years about the authentic ingredients for shepherds, or cottage pie. While it is true that many might say “this is not Shepherds Pie if it contains no lamb!” I beg to differ. Oh yes, I am well aware that because it is made with beef as opposed to lamb that it should rightfully be called “Cottage Pie”. But that’s not what they called it when I learned to love it!

I apologize for bringing up my childhood twice in as many posts but is that not truly when many of our adult likes and dislikes are formed? When I was in elementary school one of my favorite, absolute favorite dishes on the cafeteria (or cafetorium) menu was named “Shepherd’s Pie” and this recipe is my rendition of that dish. This is how I remember it tasting and once again we’re talking comfort food, so this is how I prepare it.

Honestly, I won’t be insulted if you call it cottage pie; call it anything you like…what really matters to me is that it tastes good. After all if we were really going to get down to brass tacks then do you think that stuff they served at the “PTA Spaghetti Dinners” would pass as Spaghetti with a true Italian? Ha! I think not. But that doesn’t mean I didn’t gobble it up with enthusiasm each and every time I ate it. I hope you do the same with this recipe.

Notes: I use a fork to “rake” the top of the potatoes because I think it facilitates browning and creates a crispier crust. I do not use cheese because they didn’t use any when I was a kid. Please feel free to add anything you like to the recipe. (On that note, I think I will add a cup of chopped green onions to the potatoes the next time around.)

Shepherd’s Pie, American Style

1 Lb – Lean Ground Beef
1 Cup – Carrots, diced large
1 Cup – Celery, diced large
1 Cup – Onion, chopped
32 Oz – Lower Sodium Beef Broth
2-3 Tbsp – Red wine, chilled
2 Tbsp – HP (or A1) Steak sauce
2 Tbsp – Unbleached All Purpose Flour
1 Tbsp – Dried Thyme
1 Tbsp – Dried Tarragon
8 Oz – Frozen Sweet Peas
3 Lbs – Red Bliss Potatoes, cut in (roughly) 1 inch chunks
2 Cups – Low Fat Buttermilk, plus a little extra if needed
Kosher Salt & Fresh Ground Black Pepper, to taste
Olive Oil

In a large sauté pan over medium heat warm 2 tablespoons of olive oil until shimmering. Stir in carrots, celery, and onion along with ½ Tbsp each of thyme and tarragon. Cook stirring occasionally until the onions become translucent, about 10 minutes.

Add the ground beef to the pan and break it up with a fork while stirring to mix. Add the remainder of the thyme and tarragon along with about ¼ tablespoon of pepper and the steak sauce. Continue cooking and stirring occasionally until the beef has browned. When the beef has browned and cooked through, add the broth and simmer while you prepare the potatoes.

Place potatoes in a large pot with enough water to cover them by ½ inch. Add about 1/8 cup of kosher salt and bring to a boil over high heat. Lower heat to medium and cook until potatoes are fork-tender, about 20 minutes.

Pre-Heat the oven to 350 degrees.

When the beef & broth mixture has simmered at least 20 minutes, strain about 1 cup of the hot stock into a bowl. Add 2 -3 tablespoons of cold red wine and set aside to cool while you mash the potatoes.

When the potatoes are very tender carefully drain them in a colander or strainer allowing them to sit a few minutes to steam off excess moisture. Place hot potatoes in a large bowl and using a potato masher, dough cutter, or a large fork mash in about 1 cup of the buttermilk. Continue mashing until the liquid has been absorbed, then drizzle in the second cup of buttermilk while still mashing the potatoes. If the potatoes are still too dry drizzle in a little extra buttermilk, while mashing, until the mashed potatoes reach your desired consistency.

Whisk 2 Tbsp of flour into the reserved stock and wine mixture then stir this into the simmering beef mixture along with the frozen peas. Stir gently until everything is incorporated, heated through, and slightly thickened then spoon or pour the mixture into a 9” X 13” casserole. Using a spoon and your fingers if necessary spread the potatoes over the top of the beef mixture.

Before baking, smooth the top of the potatoes, then use the back of a fork to create parallel 1/8 inch deep “grooves” along the length of the entire dish to give the topping some texture. Place in the oven and bake 30 minutes. Carefully remove the dish from the oven and rest 10 minutes before serving.

Enjoy,

Randy

Grilled Fish 101: Two Recipes For The Price Of One!

maybe2

Last weekend I had friends coming over for dinner and I wanted fresh fish. Having not had the opportunity to catch my own recently I did the next best thing and headed for the fish market. Pickings were a little slim at Restaurant Depot but I noticed some large Wahoo fillets. I asked the gentleman behind the counter if I could examine one and he gladly handed me a latex glove.

I laughed and told him that I am bit of a stickler about fish being fresh, then I poked the fillet, squeezed it little to make sure it sprung right back, I even gave it a little sniff. I told him that Wahoo was one of the best fish in the ocean but it absolutely must be fresh! Then I asked him to cut a 4 pound chunk of this perfect fish for me to take home. I smiled a little when as I walked away the guy behind me said “Yeah, I think I would like some of that Wahoo too!”

Freshness truly is half the battle when it comes to fish. The other half is cooking it right! The key with firm and lean fish is to never, ever overcook it. I always say to take the fish off the grill just before it’s cooked through and let it finish on the plate. Believe it or not, fish is so delicate that the heat from cooking will carry over and finish the fish on the plate while still leaving the flesh moist and tender.

To be sure about the doneness I don’t mind using a fork or a knife to check the progress but it’s not always necessary. With fish, especially fish steaks, you can watch the edges turn from translucent to opaque as the fish cooks. When grilling simply keep an eye on the side of the fish and turn it just as the doneness reaches the halfway point. Cook the other side for the same amount of time and viola, you are ready for the plate!

My friend Cyndi asked me for a recipe for this delicious fish and I am going to post not one but two because I couldn’t pick a favorite! Both recipes are exceedingly simple, grilled, and both are perfect for firm lean fish such as Wahoo, Swordfish, Mahi Mahi, or Halibut. The first recipe calls for Za’atar seasoning. This savory spice mix is available at most Middle Eastern, kosher, and halal markets as well as some finer grocery stores. It is one of my favorite spice blends!

Maybe

Grilled Fish with Za’atar and Lemon

Fish steaks or fillets cut into serving portions
Za’atar Seasonings
Fresh lemon juice
Good Olive oil
Salt & Pepper to taste


Preheat a charcoal, gas grill, or grill pan. Sprinkle fish generously on both sides with Za’atar seasonings, drizzle with lemon juice, and olive oil. When the grill is hot soak a paper towel with oil and using tongs, carefully rub to coat the grill with oil. Place the fish on the grill and cook two minutes, turn the fish clockwise 90 degrees and cook two more minutes or until the fish turns white “almost” half way through.


Turn the fish over and repeat removing the fish to a plate just before the fish cooks through to the center. (Use a fork to test if necessary and remove the fish from the grill just as the center turns opaque being careful not to overcook). Drizzle each serving with a little more olive oil and serve.

Grilled Fish with Compound Butter

Fish Steaks or Fillets, cut into serving portions
1 Stick (1/2 cup) Unsalted Butter, softened
Zest of ½ a Fresh Lemon
1 Large Clove of Garlic, finely minced
1 Tsp – Fresh Parsley, minced
½ tsp – Fresh Rosemary, minced
½ tsp – Fresh Oregano, minced
½ tsp – Dried Red Pepper, minced
¼ tsp – Fresh Black pepper, ground
¼ tsp – Kosher Salt
Good Olive Oil


Blend butter well with the herbs and spices and wrap it in plastic wrap forming the butter roughly back into a stick. Place the butter in the freezer for 30 minutes or until firm.


Preheat a charcoal, gas grill, or grill pan. Drizzle both sides of the fish with olive oil and sprinkle with salt & pepper. When the grill is hot soak a paper towel with oil and using tongs, carefully rub to coat the grill with oil. Place the fish on the grill and cook two minutes, turn the fish clockwise 90 degrees and cook two more minutes or until the fish turns white “almost” half way through. Turn the fish over and repeat removing the fish to a plate just before the fish cooks through to the center. (Use a fork to test if necessary and remove the fish from the grill just as the center turns opaque being careful not to overcook).


Immediately top each fish portion with a pat (about a tablespoon) of the compound butter so that the heat of the fish melts the butter creating a sauce.

Enjoy!

Sunday Brunch: Chinese Style Shrimp and Eggs

Brunch

Sunday brunch is one of my favorite meals! I have such fond memories of preparing late morning (or early afternoon) omelets, French toast or pancakes for my daughters as they were growing up. Nowadays it just Kat and I most weekends but that hasn’t diminished the joy of getting in the kitchen with a hot cup of coffee and whipping up something tasty and interesting on a lazy Sunday afternoon.

I had bought some amazing looking shrimp earlier this week so today I was looking for recipes with shrimp and eggs. I had thought of egg fu yung but that would mean a trip to the store. A frittata sounded interesting too but with ginger and garlic on my mind I found this recipe on one of my favorite web sites!

Using Shao’s recipe for inspiration I added potatoes for substance and a little Sriracha for warmth and came up with an interesting dish that would even make for a light and easy weeknight dinner. Served with a simple slaw of mixed cabbage tossed with a little rice wine, rice wine vinegar, and sesame oil this was a satisfying and delicious Sunday Brunch.

Notes: This recipe serves two. A wok would be a perfect cooking vessel for this, especially if you were going to double the recipe. Be careful not to over beat the eggs, there should still be some separation between the whites and the yolks. And, do add a little more Sriracha at the table for a great boost of flavor to wake up your taste buds!

Chinese Style Shrimp and Eggs

4 – Large Eggs
8 – Fresh Large Shrimp, peeled and deveined
1 Cup – Yukon Gold Potatoes, cut in ½ to ¾ inch cubes
1 Tbsp – Baking Soda
2 Tbsp = Kosher Salt, divided
Fresh black pepper
Cold Water
1 ½ Tbsp – Low Sodium Soy Sauce, divided
½ Tsp – Chili Sauce
1 Tbsp – Unsalted Butter, divided
1 Tbsp – Sesame Oil, divided
1 Tsp – Fresh Garlic, minced
1 Tsp – Fresh Ginger, minced
½ Cup – Fresh Scallions, green parts only, cut in approx. 1 inch pieces

In a bowl (or a zip lock bag) add 1 tablespoon of kosher salt and the baking soda to 2 cups of water and stir (or shake) to dissolve. Add the shrimp and chill in the refrigerator for 20 to 30 minutes.

Meanwhile in a small saucepan over high heat bring 3 cups of water to a boil with 1 tablespoon of kosher salt and the potatoes. When the water reaches a boil reduce the heat to medium and cook until the potatoes test “almost” tender. About 10 minutes. Drain the potatoes into a strainer and shake to remove excess liquid. Set the strainer, with the potatoes, back over the saucepan to allow the potatoes to steam dry.

When you are ready to cook the eggs, remove the shrimp from the brine, rinse in cold water, and pat dry.

Place a 10 inch non-stick pan over medium heat and melt ½ of the butter with ½ tablespoon of sesame oil. Add the potatoes and cook, shaking the pan and stirring to turn only every couple of minutes. Cook until the cubes are nicely browned on all sides.

Add the shrimp, shaking the pan to evenly distribute. Cook the shrimp for about 1 minute on each side before adding the garlic, ginger, and a splash of the soy sauce (about ½ Tbsp.). Shake the pan and gently stir to distribute the ingredients and cook 2 minutes more, stirring gently only 2 to 3 times. Toss with the scallions, remove from the heat, and transfer the mixture to a bowl. (There is no need to wipe the pan.)

Gently beat the eggs together with the remaining soy sauce, the chili sauce, and about 1/8 teaspoon each of kosher salt & fresh ground pepper. Add the pan back to medium heat and melt the remaining butter with ½ tablespoon of sesame oil.

Swirl the pan to distribute the oil then add the eggs. Cook 30 seconds then shake the pan a little to loosen the eggs. Continue giving the pan and occasional shake while using a rubber spatula to break up the curds moving them towards the center of the pan.

When the eggs are mostly cooked with some still a little loose, gently stir the shrimp mixture into the pan. Cook no more than one more minute as you gently stir to combine.

Serve immediately garnished with a few sprigs of scallion and a little hot chili sauce on the side.

Enjoy!

Super Bowl Special: My Favorite Chicken Wings

Poster

Are you ready for some football? I’m excited about the post season and a little let down at the same time. Once again…the Dolphins made me cry! But, enough of the sniveling, how about some incredible chicken wings for your Super Bowl party?

I cannot make claim to this recipe as it is nearly word for word straight out of the Silver Palate Cookbook. Originally called Chicken Marbella, this wonderful recipe has been shared and talked about by many throughout the years. I however have made minimal changes to the recipe and cooking technique in order to make it “wing friendly”.

I made this batch after asking my daughter what she would like me to cook for her birthday to which she immediately answered “Oh my gosh how about those wings?” I knew exactly which recipe she was talking about! She likes them with a creamy Tzatziki sauce and celery sticks but I just gobble them down straight off the platter. Either way I can pretty much guarantee these wings will be the hit of the party and a new favorite in your recipe file!

Chicken Wings Marbella

10 Lbs – Chicken Wings, cut at the joints, tips removed
1 head of garlic, separated and peeled
1/4 cup dried Mexican oregano
1 Tsp Kosher salt
1/2 Tsp – freshly ground black pepper to taste
1/4 cup – red wine vinegar
1/4 cup – sherry vinegar
1/2 cup olive oil
1 cup pitted prunes
1/2 cup pitted Spanish green olives
1/2 cup capers with a bit of juice
6 bay leaves
1 cup light brown sugar
1 cup white wine
1/4 cup Italian parsley or fresh coriander (cilantro), finely chopped

Place cut wings in a large bowl. Place garlic, vinegar, olive oil, oregano, salt and pepper in a blender or small food processor. Pulse until garlic is “just” pureed. Pour the garlic mixture over the wings, add the prunes, olives, capers, and bay leaves then toss gently to coat. (I used my hands to gently fold the marinade into the wings.)

Cover the bowl and marinate the wings overnight.

Preheat the oven to 375. Spread wings evenly on one or two large sheet pans. Sprinkle the wine evenly over and around the wings then sprinkle evenly with the brown sugar. Bake 25 minutes.

If using two pans, switch the pan locations in the oven moving the pan on the bottom oven rack to the top rack and vice-versa. Then bake 25 minutes more.

Raise the oven temp to 500 and bake 10 more minutes monitoring very closely for burning. (If using two pans I recommend cooking each pan one at a time for this final browning step.)

With a slotted spoon transfer the wings, prunes, olives and capers to a serving platter or crock pot. Moisten with a few spoons full of pan juices and sprinkle generously with chopped parsley. Serve any extra pan juices in a sauce boat on the side.

Enjoy!

By Request: Rosemary Grilled Shrimp with Prosciutto with Key Lime Cocktail Sauce

Shrimp (Edit 2)

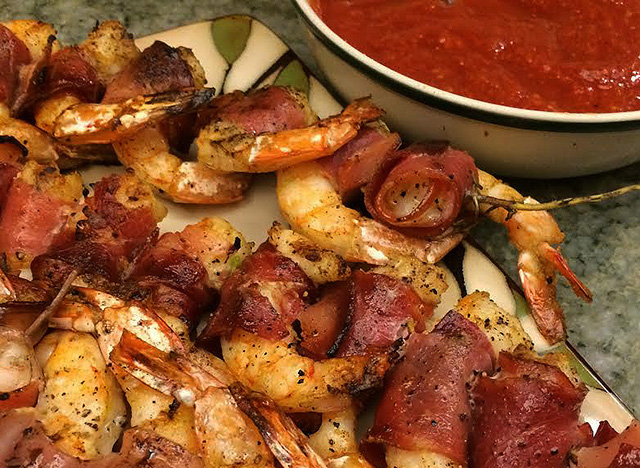
Rosemary Grilled Shrimp with Prosciutto with Key Lime Cocktail Sauce

What? Shrimp again? Well, football season is now in full swing and I prepared these shrimp at our first Miami Dolphins tailgate party. They were such a hit that I had several requests for the recipe the very next day.

This recipe presents a perfect opportunity to mention “levels of flavor” once again as these shrimp benefit from the flavor boosts of the prosciutto and the rosemary. While they are very good without the prosciutto (and I have made them that way for friends that do not eat pork), the addition of the prosciutto, in all its salty, crispy, goodness, really does add another level of flavor that makes these shrimp a very special treat!

Add to that the fresh rosemary branches used as skewers and while you can certainly use bamboo or metal skewers, taking the extra step and using the rosemary adds a smoky, piney bite as the branches smolder on the grill and again another level of flavor that I think knocks these shrimp right over the top of the flavor scale.

As if those 2 levels of flavor were not enough, along comes the citric acidity of the lime juice and the kick of the horseradish in the Key Lime Cocktail Sauce to again take it to another level and a good dish suddenly becomes the hit of the party. Touchdown!

Key Lime Cocktail Sauce

1 – 12 Oz bottle Prepared Chili Sauce
2 Tbsp – Fresh or bottled Key Lime Juice (I used Nellie & Joe’s from Publix)
1 heaping tablespoon – Prepared horseradish
½ Tbsp – Fresh ground black pepper
1 pinch – Kosher salt

Combine all ingredients and stir to mix well, chill thoroughly before serving.

Rosemary Grilled Shrimp with Prosciutto

2 Lbs Fresh Shrimp – Peeled and deveined
½ Lb – Prosciutto, thin sliced and cut into ½ inch wide strips
Zest of 1 large (or 2 medium) fresh lemon, divided in half
2 cloves – Garlic, grated or minced very fine
2 Tbsp – Dry Sherry
Extra Virgin Olive Oil
1 pinch – Kosher salt
Fresh ground black pepper

4 to 8 – Fresh Rosemary branches, leaves removed (with 2-3 inches of leaves remaining at the tip).

In a medium-sized mixing bowl combine half of the lemon zest with the next 2 ingredients, add a pinch of kosher salt and several good grinds of black pepper (about ½ tsp) then roughly ¼ cup of olive oil. Whisk until the olive oil begins to emulsify (or thicken). Gently toss the shrimp in this mixture until well coated, cover and refrigerate at least 1 hour.

While the grill is heating up, wrap each shrimp individually with a strip of the prosciutto. Using the rosemary branches as skewers, thread the shrimp evenly on 4 to 8 of the skewers (depending on the length of the branches). Drizzle the skewered shrimp with a little more olive oil, sprinkle them evenly with the remaining lemon zest and a few more grinds of black pepper.

Grilled directly over the flames, turning only once, until the prosciutto is crispy and the shrimp are browned and cooked through, about 3-4 minutes per side depending on how hot the grill is. Serve with Key Lime Cocktail sauce and…

Enjoy!

Randy

Surf & Turf Salad: Thai Style Quinoa Salad with Spicy Peanut Dressing

Thai style surf & turf quinoa salad

Upon returning home after traveling and dining out for a few days I was looking very much forward to a home cooked meal last night! After rustling through the cupboards and the freezer I settled on surf and turf in the form of a grouper fillet from my last trip to the Florida Keys, complimented by a small skirt steak. Neither was quite enough for a meal by itself but together I thought I could come up with something special for the two of us.

While exploring the fridge I also stumbled upon a bottle of Thai style peanut dressing I had made just before leaving town and that got me thinking salad would be just the ticket! The first order of business was making a Thai style marinade for the steak and a batch of quinoa that would complement those flavors. For the dressing I had used This Recipe from a blog that I follow and added only a teaspoon of tamarind paste and a splash of fresh coconut milk for a flavor boost.

The salad itself was simply ingredients I had on hand; the base was a “Power Greens” salad mix with chopped red cabbage, grated carrots, and chopped celery. I tossed each portion gently with ½ cup each of the quinoa and garnished the salad with cucumber slices, fresh parsley, and some pickled baby beets that were also on hand. After dressing the salad I set the cooked fish and sliced steak on top and sprinkled everything with a few black and white sesame seeds. I also added a few raw cashews at the table as an afterthought (not in picture).

Thai Marinade for Steak or Fish

2 – Scallions, chopped
1 – 3 inch piece of Lemon Grass stalk, pounded to release flavor
¼ Cup Light Soy Sauce
1 Tbsp – Grape Seed Oil
1 Tbsp – Sesame Oil
1 Tbsp – Rice Wine Vinegar
1 Tbsp – Fresh Garlic, Minced
1 Tbsp – Fresh Ginger, Minced
1 Tbsp – Fresh Lime juice (about ½ of a lime)
1 Tbsp – Fresh lime zest (also about ½ of a lime)
½ Tsp – Sriracha or similar (or to taste)

Combine all ingredients and whisk to combine.  Soak steak until ready to grill (at least 30 minutes and up to 24 hours). Soak fish for no more than 20 minutes for best grilling results.

To prepare the meats: Preheat the oven to 400 degrees and the grill pan over medium high heat for 2-3 minutes. Brush the grill pan with a little grape seed oil and place the fish at an angle to the ridges in the pan. Cook 2-3 minutes (depending on thickness), turn and cook 2 minutes more. Place the fish on an oven proof dish and finish in the oven just until the flesh flakes easily with a fork.

While the fish is in the oven wipe the grill pan, heat the pan over medium high heat until smoking hot, brush the surface with a little more oil. Make sure your steak is trimmed of any excess fat or silverskin and and place the steak at an angle to the ridges in the pan. Cook without moving for 2-3 minutes, turn and cook 2-3 minutes more (depending on thickness). Rest the steak on a plate for at least 5 minutes before slicing ACROSS the grain.

Thai Flavored Quinoa

1 Cup – Quinoa, rinsed (I used Trader Joe’s Organic Tri Colored Quinoa)
2 Cups – Water
1 Tbsp – Dark Soy Sauce
1 Tbsp – Sesame Oil
1 Clove – Garlic, whole
2 – 3 inch pieces of Lemon Grass stalk, pounded to release flavor
Salt and fresh ground black pepper to taste

Warm a medium saucepan over medium heat, swirl in the sesame oil then stir in the quinoa, garlic, and lemon grass. Toast gently for about 5 minutes stirring occasionally or if you hear popping. Dissolve the dark soy sauce in the water then pour, while stirring, over the quinoa. Raise the heat to medium high and allow the mixture to come to a boil. Reduce the heat to low, cover the pan and cook 15 minutes more. Fluff the quinoa with a fork and allow it to cool before tossing into your salad, remove the lemon grass and garlic before serving.

To serve prepare your salad base of mixed greens (use your imagination!), grated carrots, cut celery, and red cabbage. Toss gently with ½ cup of quinoa per serving and garnish with sliced cucumbers, radishes, pickled beets or whatever else you like. Drizzle the salad with dressing, place your fish and sliced
steak on top and garnish with sesame seeds and a little sliced scallion.

Enjoy!

Yard Sale Brunch: Personal Frittatas with Shrimp, Bacon, and Smoked Gouda

Shrimp & Bacon Frittatas

My wife Kathy and some of our friends had another yard sale today. As usual, once the tents and tables were up, I wanted to make a brunch treat to go along with their requisite mimosas. I had a shrimp and bacon frittata in mind based loosely on a pizza we’ve had at one of our favorite haunts in the Florida Keys. Trouble is, after picking up all of my ingredients last night I realized this morning that our oven is broken!

I was contemplating how to do a frittata on the grill when Kathy suggested I use the toaster oven and a muffin tin to make mini (personal) frittatas. What a novel idea! You don’t have to make yours in a muffin tin but they really were great for an outdoor brunch. They went perfectly with chilled fresh cantaloupe and the banana muffins someone else made…not to mention those mimosas!

I make frittatas often, sometimes even for dinner, and I always use this web article as a  guide: http://www.finecooking.com/articles/cyor/frittata.aspx. I know I’ve posted it before but really can’t recommend it enough…we have yet to be disappointed.

Shrimp and Bacon Frittatas with Smoked Gouda

24 – Medium Shrimp
8 – Large Eggs
6 slices – Thick Sliced Uncured Applewood Smoked Bacon, cooked (2 Slices Reserved)
1/2 Cup – Smoked Gouda Cheese, Grated
1/2 Cup – Heavy Cream
3 – Green Onions (about ¼ cup sliced)
1 Tbsp. – Unbleached All Purpose Flour
1 Tbsp. – Unsalted Butter, Melted
Kosher Salt
Freshly ground Pepper
Olive Oil Spray

Pre-heat the oven to 325 degrees. To prep the shrimp, dissolve 2 Tbsp. kosher salt in 4 cups of water. Peel and devein the shrimp and soak them in the salty water for a few minutes while preparing the other ingredients. Place another pan of water on the stove and start bringing this to a boil.

Slice the green onions diagonally into roughly 1/8 to 1/4 inch slices then cut 4 slices of bacon in half first lengthwise, then into ½ inch pieces. Grate the cheese and place together in a bowl with the onions and bacon.

When the pan of water has come to a boil strain the shrimp, blanch them in the boiling water for one minute, then strain them again. Toss these in a bowl with the melted butter then, when cool enough to touch, cut each shrimp crossway into 2 -3 bite sized pieces.

Whisk the eggs in a separate bowl with the cream and the flour, adding fresh ground pepper to taste. Then gently fold in the cheese, onion, and bacon mixture. Lastly, gently fold in the shrimp and you are now ready to make your frittata!

If you are going to use a muffin tin, line each cup with paper muffin cups. Give each cup a good spray of olive oil then using a very large spoon distribute the egg mixture as evenly as possible into twelve cups. Place the muffin tin carefully in the oven (or toaster oven) and bake 20 minutes, checking often after 15 minutes to make sure the tops don’t get too brown. Allow these to cool a few minutes before serving.

Before serving slice the remaining bacon pieces on an angle and garnish each personal frittata with a piece poked into the top.

Alternative cooking method: Heat 1 Tbsp. of olive oil in a 10 inch non-stick pan over medium-high heat. When the pan is hot, pour in the egg mixture evenly, reduce the heat to low and cover. Cook for 10 minutes until the eggs begin to set and finish in a 325 degree oven until set, 15 – 20 minutes.

Allow the pan to cool a little before carefully sliding the frittata onto a cutting board, cool a few more minutes, slice and…

Enjoy!